Hellllllllo Fibre Family!!

Happy International Woman’s Day!! 8 March 2019 🙂

If you follow me on Instagram you may have seen my Insta Story about when I was going to post this blog and the Large Granny Heart video. I was ‘wearing’ that cute little beret and veil… Its saved on my home page in highlights.

Anywho I mentioned that I was physically and mentally exhausted and would try and write the post in the next day or two… well ends up a had a few more big days that just knocked me around and all I wanted to do was sleep. And that’s about all I could do.

But I’m here and it’s here now!!

In the YouTube video I mention the options for colour changes; I don’t really cover them here. I basically just say colour change. In my Small Granny Heart I carry the yarn along the rows and in this square I just run the yarn across the rows and diagonally when I was lazy 🙂

I also mention another Crochet designer Fi of ReVe Design Co in the video, I have all her links listed below and some more info on all the goodies she does. Go check her out!!

SO…

I’ve written this pattern differently instead of writing out every cluster as (3Trc, ch1) a single cluster or (3Trc, ch1, 3Trc, ch1) Corner cluster. I’ve used the terms single cluster and corner cluster. If you have to colour change you will see around row 8ish that the pattern directions format changes because there are so many colour changes for each colour change the directions for how many clusters are on a new line, I have at times inserted the individual Sts as a reminder.

e.g. –

Colour 2, **single cluster, Corner Cluster, Single cluster**,

(3Trc, Ch1), (3Trc, Ch3, 3Trc, Ch1), (3Trc, Ch1)

Colour 1, 4 Single Clusters.   (3Trc, Ch1) x4,

Colour 2 Repeat from ** to **. Colour change

Starting in our 1st corner with C1, Corner cluster (3Trc, Ch3, 3Trc, Ch1) and 5 single clusters (3Trc, Ch1).

                Colour 2, 2 single clusters, corner cluster, 2 single clusters CC

                Colour 1, 3 single clusters, CC

Or

                Colour 2, 3 single Clusters, Corner cluster, 3 single clusters, CC

                Colour 1, 5 single clusters, CC

                Colour 2, corner cluster, CC

                Colour 1, 2 single clusters, CC

And for some reason as I imported the text the formatting messed up on some of the rounds with the Tabs – its not all in a nice neat line like I like it… :/

To make the large granny square heart (video) you will need-

  • Yarn – at least 2 colours for a basic square
  • Crochet hook to match your yarn
  • Scissors
  • Yarn needle
  • Stitch markers/bobby pins/scrap yarn

I Know I said it in the video – probably a number of times, but I just counted the rows to figure out where Beth (owner of the original picture I worked from) had placed her colour clusters. *** Amendment I recently found out its a Redheart pattern*** name and link at end of post.

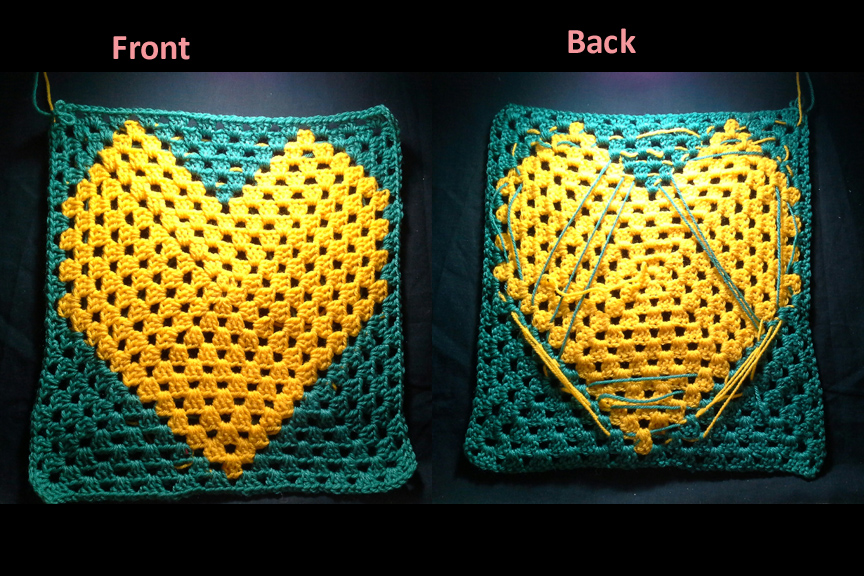
I will put in pics of My Square and Redheart’s square.

Some details

In the video you hear me say colour clusters and I probably don’t make it all that clear… It’s clear to me at the time. But what I mean is you start with your first colour and then you start your COLOUR CLUSTERS with your 2nd colour and my case green in Beth’s picture it’s a white.

You will have 3 main colour clusters.

  1. The left side of the V of the heart
  2. The right side of the V of the heart
  3. The V between the 2 ‘peaks’ of the top of the heart

On the last 2 colour change rounds there are 2 more very small colour clusters that shape the outside peaks of the heart on the outside left and outside right.

When starting this project you can make it as large as you want but there are some minor guidelines to follow.

  1. You need to start with a square with an EVEN number of rows e.g. 6, 8, 10, 16
  2. Your 2nd colour will always start on an EVEN numbered row e.g. 6 row square = rnd 10, 8 rnd square = rnd 12, 4 rnd square = rnd 8, 12 rnd square= rnd 16.
  3. Your main colours last round/row will ALWAYS be on an ODD numbered round/row
  4. PAY ATTENTION when you get to the peaks and valleys of the top of your heart! It is so easy to forget to do the side shaping (GUILTY here!!)

This project is more for an intermediate and above crocheter who can handle colour changes, counting clusters, rows and dealing with tangled yarn (and a not so well written pattern)

Stitches/Terms Used

Trc – Treble Crochet

Ch – Chain

Ch 3 – Chain 3

CsTrc – Chainless Starting Treble Crochet – shown in video

C1/C2 – Colour 1, Colour 2

CC – Colour change

Single Cluster – (3Trc, Ch1) work these Sts into designated space

Corner Cluster – (3Trc, Ch3, 3Trc, Ch1) work these Sts into the designated space

Making the Large Granny Heart Square

This square works well with the Granny Stitch – (3Trc, Ch1) in 1 chain space, this is also known as a cluster.  Also if you have loose tension and prefer (2Trc, Ch1). I would love to see your squares if you do use the 2Trc Granny stitch.

A Ch3 at the beginning of a cluster counts as a Trc.

This is the pattern for starting with a 6 round granny square.

Starting with a magic loop or ch4 and slst to the first ch to make a ring

1)            Work 3Trc, Ch1 into your starting ring 4 times, Slst to the top of your first Trc.

2)            Slst across the top of the cluster Sts (see video). (Ch3 or CsTrc, 2Trc, Ch3, 3Trc, Ch1) This is your first corner. (3Trc, Ch3, 3Trc, Ch1) 3 times. Slst to first Trc.

3-6)        continue working Granny clusters of (3Trc, Ch1) in each ch space and (3Trc, Ch3, 3Trc) in each corner. Slst to the first Trc/CsTrc. Slst across to corner        

7)            Start with Granny stitch corner cluster C1 in top left hand corner, work down the 1st side of the square stopping in the last ch sp before the corner to CC to C2. Work the Corner in colour 2 then change back to colour 1, repeat for 3rd corner. After Corner 3 continue working your 1st colour down the 3rd side of your square. Take a moment to find the middle ch sp from row 6 and mark it, continue with C1 to the sp beside your marker, CC and work C2 into the marked space CC again and work across to 1st corner. Slst to 1st Trc and across to corner space.

NOTE

You will notice now that you have your 3 main colour clusters started in place they will start to ‘grow’ out diagonally.

Rows 7-9 should have the same number of clusters in your 1st colour from the corner to the 1st colour change. A corner (2 clusters) and  5 single clusters, the same goes for the opposite side if you count from corner 3 to 4 there will be 5 single clusters then a corner (2 clusters).

From now on our colour clusters (2nd colour) will grow.

8)            Starting in our 1st corner with C1, ^Corner cluster (3Trc, Ch3, 3Trc, Ch1) and 5 single clusters (3Trc, Ch1) ^.

Colour 2, **single cluster, Corner Cluster, Single cluster**,

(3Trc, Ch1), (3Trc, Ch3, 3Trc, Ch1), (3Trc, Ch1)

Colour 1, 4 Single Clusters.   (3Trc, Ch1) x4,

Colour 2 Repeat from ** to **. CC

Colour 1, Repeat from 5 single clusters, corner cluster, 2 single clusters, CC

Colour 2, 2 single clusters, CC

Colour 1, 2 single clusters, Slst to join and across to corner.

9)            Starting in our 1st corner with C1, Repeat from ^ to ^ from row 8, CC

                Colour 2, 2 single clusters, corner cluster, 2 single clusters, CC

                Colour 1, 3 single clusters, CC

                Colour 2, single clusters, corner cluster, 2 single clusters, CC

                Colour 1, 5 single clusters, corner cluster, 2 single clusters, CC

                Colour 2, 3 single clusters, CC

                Colour 1, 2 single clusters, Slst to 1st Trc and across to corner.

Note – here we start shaping the far left and far right sides of the peaks of the heart, you have to pay attention to what you’re doing or you will be frogging…

10)          Starting in the 1st corner with Colour 2, Corner cluster, CC (3Trc, Ch3, 3Trc, Ch1)

                Colour 1, 5 single clusters, CC [single cluster – (3Trc, Ch1)]

                Colour 2, 3 single clusters, Corner cluster, 3 single clusters, CC

                Colour 1, 2 single clusters, CC

                Colour 2, 3 single Clusters, Corner cluster, 3 single clusters, CC

                Colour 1, 5 single clusters, CC

                Colour 2, corner cluster, CC

                Colour 1, 2 single clusters, CC

                Colour 2, 4 single clusters, CC

                Colour 1, 2 single clusters, Slst to 1st Trc and across to corner

[I changed colour from C1 to C2 with my Ch1 after my last single cluster (3Trc, CC, Ch1, slst to fist st and across to corner]

11)          This is our last row with our 1st colour.

Starting in our 1st corner with our 2nd colour, Corner cluster [3Trc, Ch3, 3Trc, Ch1], single cluster [3Trc, Ch1], CC

                Colour 1, 4 single clusters, CC

                Colour 2, 4 single clusters, corner cluster, 4 single clusters, CC

                Colour 1, 1 Single cluster, CC

                Colour 2, 4 single clusters, corner cluster, 4 single clusters, CC

                Colour 1, 4 single clusters, CC

                Colour 2, 1 single cluster, Corner cluster, single cluster, CC

                Colour 1, 1 single cluster, CC

                Colour 2, 5 single clusters, CC

                Colour 1, 1 single cluster, CC

                Colour 2, 1 single cluster, CC, Slst to 1st Trc and across to corner.

You can leave your square here and call it finished or you can do one more round in either your 2nd colour or another to give it a border. I’d stick with the 2nd colour and do 1 row to give it that finishing touch.

12)          Starting in your first corner using your 2nd colour work your whole round with corner clusters in the corners and single clusters in ch1 spaces.

Finishing off – if you have cut your ends to change colour weave in your ends.

You will end up with something that looks like this – (if you just run the colours)

My Granny square heart.

Alternative looks, you could also take the artistic approach and use scrap yarn for either colour 1 OR colour 2 making sure your 2nd colour is a solid colour. Meaning either scrap yarn to make the heart shape or the boarder and shaping colour.

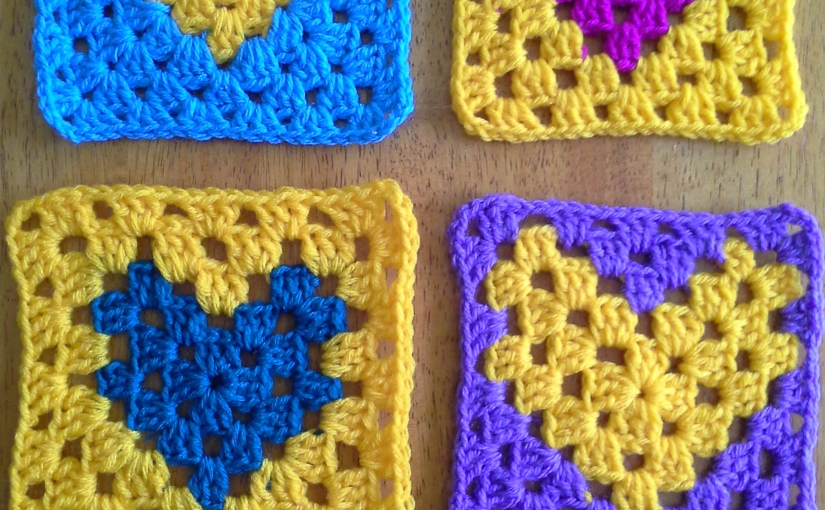
It would also be very interesting to see an afghan made of these squares, in various sizes including the small squares to help fill in spots.

So that’s it for the Large Granny Square Heart! If you would like I can write up the pattern with the individual Sts and send it to you if you contact me here, on YouTube (Crochet Connections) or on Instagram (@crochet_connections)

Please let me know if you think I’ve made any mistakes in the pattern and I’ll try to fix them ASAP!!

I really would like to see your creations of this project and others so tag me on Instagram or email me – crochetconnections@gmail.com with pictures, requests for videos or questions about patterns or a stitch or just anything in general 🙂

Please go check out Fi’s social media I’ll put all the links here –

My next video will probably be one of her patterns 🙂

Website: https://revedesignco.com/

Ravelry: https://www.ravelry.com/stores/reve-design-co/

Facebook: https://www.facebook.com/revedesignco

Facebook Group:https://www.facebook.com/groups/FisCrochetFriendsaroundtheWorld/

Instagram: https://www.instagram.com/revedesignco/

Pinterest: https://www.pinterest.com.au/ReVeDesignCo/

LoveCrochet: http://bit.ly/ReVe-LoveCrochet/

Don’t forget to sign up to her newsletter she does amazing giveaways, discounts and patterns of the month… She also writes her patterns in both UK/AU and US terms!!

That’s enough from me for now, congrats if you made it this far!!

Remember stay safe and…

Up, Up and CROCHET!!

Allie 🙂

Side note the original picture comes from the Redheart pattern publication and is subject to copyright I am not claiming it as my own. The pattern is Contest Favorites Heart Squares Afghan (Square2). You can down load the pattern from this link.

Welcome to Crochet Connections

Welcome

This is the blog that will run along side the youtube account for Crochet Connections so if you have any detailed questions this is the place to ask!

My aim is to provide easy to follow videos with simple instructions using Eu/Au crochet terms as I’ve noticed that there are alot of blog on the internet that cater to US terms but not so much Eu/Au.

I hope to be bale to find new and interesting patterns to make videos and pictorial tutorials on.

I have a talent for crochet – not so much for words … I try to explain things as I would physically do them – sounds silly me saying it but if you have ever tried to read a crochet pattern and given up because it simply wasn’t clear enough? That’s where I come in and try and simplify it.

This will be a learning experience for both you and me as I learn how to best use my video editing software and get the best out of my camera.

So stick with me and hopefully this wont be too much of a bumpy ride.

Granny Square

The Humble Granny Square.

So the small granny heart is worked exactly the same way as a regular Granny square… just with a few colour changes!

As long as you know how to make a granny square you’re all good!!

But this post isn’t about the Granny Heart Square…

Originally I wasn’t going to make a video on how to make a granny square because there’s just so many out there. But I did it anyway because I needed one for the large granny heart so I will be posting that shortly.

You’d think that would be a short video right… well not in my case. Though I do cover colour changes in the video and running colours up the back of your work. I am a bit long winded in all my videos.

There’s not much I can say about granny squares, there’s a lot of videos on the internet about them. They are versatile and very warm! I feel the cold in winter and I had a partly finished GS blanket that I was using and it was freaking too warm over my long pants!!

There’s a bunch of ways to join them, but ultimately my favourite it the Join as you go method. If you’re not using the same colour on the last row of all your squares you will be able to see the joins if you look closely but it sure beats sewing all the squares together or even crocheting them together afterwards (IMHO).

I will eventually do a video on joining granny sqyares but once again there are a bunch of videos out there. I watched a bunch of videos, most of them on mute… some of them helpful most of them not.

I’m not saying my video will be helpful – quite the opposite probably but I will still give it a go but this time I’ll try and keep one joining method to one video and post them close together.

That’s about it – not really any pictures its all in the video. No that’s not a plug to go watch the video that’s just the way it is, not much to try and explain… :/

So I’ll leave it here hope everyone is having a good day/evening or night and is staying safe!!

Up, Up and CROCHET!!

Allie 🙂

New Year, New Project

Happy New Year Fibre Family!!

So Its 2019… Aren’t we meant to be traveling around in flying cars by now or is that next year??

For my first blog post of 2019 I have based it on my latest YouTube video.

THE GRANNY SQUARE HEART

Actually the video is based on a project for my local council art gallery, they were asking for crochet and knitted squares of varying sizes to ‘Yarnbomb’ the outdoor art room… (no pictures yet). I didn’t just want to do plain squares and about 6-8 months ago had seen a colour block granny square heart… hence this post and YouTube video!

Anywho!!

In the video I go over how to make a granny square heart. The heart is a colour block in the square.

For this pattern you need –

  • 2 different colours of yarn
  • Hook that matches the yarn you choose
  • Stitch markers (if you want)
  • Scissors

Notes on the Pattern

I would rate this pattern at an advanced beginner/intermediate simply because of the colour changes. I’m not writing this up like a pattern because there are a LOT of Granny Square patterns online in blogs, Pinterest, Instagram and YouTube ect.

If you are a beginner and want to learn how to make this Granny Heart I suggest that you check out YouTube to find a few videos on how to make granny squares then come back and try and deal with my not great directions… As long as it makes sense in my head I guess I’m ok lol.

So the pattern is actually pretty easy once you’ve done it once or twice, it’s just the turning it and looking it upside down that can get confusing.

I will refer to clusters and colour clusters. A regular cluster is 3Tr (UK)/3DC (Us). A colour cluster is where you change from your main ‘heart’ colour (1st colour) to your shaping colour (2nd colour).

You can make this granny square without cutting yarn until right at the end if you want or you can cut after each round, or cut after each colour change – totally up to you! I have used the word ‘Switch’ instead of cut. In my video I just ran the yarn along the work and crocheted over the yarn where possible.

To make the “small” granny square heart you start with your ‘Heart colour’ in the centre. You make 2 standard Granny rows.

It’s on the 3rd row where we will see things start to change. We will start to see the colour clusters appear on 2 of the corners that will begin shaping the heart, and in the centre of the top row.

Once you have the first colour clusters sorted out from there it’s pretty simple to figure out where you want to put what colour next.

I’ve attached some pics below to try and help explain this better.

Pictures 1 – 4, rounds 2 – 5 as described below

PICTURE 1 – You start with 2 rounds of a standard granny square.

PICTURE 2 – On the 3rd row we start to add colour, my advice is to keep using your main heart colour just for the moment and always start your first corner with your 1st (heart) colour.

Once you’ve started this round with your first colour you will work your corner and 1 cluster before you reach the 2nd corner, this is where we stop and switch to our second colour. Work this corner with your second colour then switch back to your 1st colour, switch back and work the 3rd corner in your second colour. You have just made your first two colour clusters! Change back to your 1st colour and work to the 4th corner, you have 1 last colour cluster left between the 2 green corners. So switch colours make your cluster and finish your round!

P.s It’s up to you if you want to cut your yarn or just switch back.

PICTURE 3 – round 4 is basically the same as round 3 except there’s more of your 2nd colour… in my case purple!! Once again you start with your corner and first cluster in your 1st colour and then look at your square you can see where each of your colour clusters start and stop. These clusters need to ‘expand’ to make your heart take shape. So with the side of your square now on top you should have your 1st colour cluster coming up and it’s a corner. Your colour clusters need to expand out diagonally so that means the space before and after your 2nd colour should have a new cluster of the same 2nd colour (once again in my case purple). You will be seeing less and less of your 1st colour – your heart colour.

In this round I only had 6 clusters of my 1st colour, 3 at the beginning and end of the round.

PICTURE 4 – This round completes your square and is done completely in your 2nd colour! This round is optional. I personally thing it pulls it all together. But who am I to say 🙂

~*~

I’m working on a video for the large granny heart. But that will take some time as I have to borrow a large freestanding tripod and figure out how to place it for best viewing angels etc…

I know I’m not the best with written instructions so please visit me on YouTube and watch my poorly edited video… hey I was tired … and ask me questions.

And you can always ask me questions here or email me at crochetconnections@gmail.com

If you have ideas for videos or want some help with a pattern, be it in Uk/Au or Us terms ask away and I’ll see what I can do

But until next time fibre family

Up, up and CROCHET!!

2016 A Fresh Start

2016 A fresh start

Hi everyone I’m back!!

You all know I had family stuff to deal with and my blog was dreadfully neglected 😦 and I apologise for that!

I dislike the whole new year’s resolutions thing so I refuse to do it I don’t really even like setting goals at the beginning of the year so that way at the end of the year I don’t feel so bad when I haven’t actually achieved them… only half as bad.
But I do have a HOPE for this blog the usual growth and popularity ect ect but that will only happen with hard work! And that’s what the HOPE is for my blog that I can put other things to the side and remain focused on my blog and post at least once a month and maybe do a progress report on a project – but that will only be if I remember because its more likely I’ll get to the end of the project and go “oh crap progress report… “

***

In my last post explaining that my internet was unreliable and more or less crap and I didn’t have access to my craft stuff I mentioned something about cross stich and also that I was working on the Brighton Blanket. Well this is where the story picks up…


I did finish my cross stitching part of the birth samplers that I made for my 2 friends and washed and ironed them but… that’s as far as I got and I still have to give one to my neighbour who wants to choose the frame for her granddaughter and I haven’t found a frame for my other friend.

I also pulled out one of my really big cross stitches that I started years ago and put to the side when I taught myself to crochet, I’ll post a pic if I remember.

The Noah’s Submarine pic was taken ages ago and I havent taken a pic sinse I finished the side animals like the zebras, crocodile, hippo, sheep, camels, and ram as well as some of the birds

***

Well you also know that I was part of a crochet satellite reef project that is sort of how the entire following story started back in 2014 sometime around June or July…

Ok so picking up from me being a terrible person and woefully neglecting my blog and not being able to make any videos etc., etc., etc.…

I made it back home just in time for one of the festivals that we have here each year called the Fringe Festival. ( I will post some pics). There was 3 weeks between the time I got home and when the fringe festival started.

That is how the Regional Art Gallery Yarn Bombing group came about, I will most likely refer to the Regional art gallery as just the Gallery or Art Gallery and the Yarn bombing croup as CRABS in the future. C is the town I live in Regional Art gallery Bombers, That is our working title and I think it might stick as we live in a coastal city right on the beach.

So I arrived home and found out that the Fringe Festival was in 3 weeks!! And was like WOAH! As I had been trying and FAILING to finish the Brighton blanket (mentioned in a previous blog post) which I still haven’t finished. The place I was staying just drains me creatively and I just don’t feel like doing ANYTHING except eating and watching Tv and even that is too much effort sometimes! I had just lost all creative energy and feeling. But I was excited to get back to the gallery and see all my friends as they didn’t know I was home and I was surprising them and I KNEW they would inspire me, so away I went! It was such a great morning and so inspiring, I came away with SO many ideas!! And a renewed determination or invigoration for crochet – basically I got excited about crochet again.

After I got home from the gallery I was just like wow there’s so much we can do!!

We had a great space to work with some big trees some medium trees, garden beds, benches and a large chess set which I got to decorate! We had lattice work panels the library uses as a security barrier for the enclosed courtyard we also had dark green lamp posts that made for great contrast colours.

Enough of the talk here are the pics !!


So then the fringe festival was over and what had taken us a full day to put up had taken less then a half hour to take down. It was a learning experience! The yarn bombing was up for 10 days and we had so may positive comments it was amazing! Not that you really expect anything less right… I mean crochet, knitting and other fibre crafts are amazing all in themselves but put them on display in the open outside to the weather and people really see it, then they REALLY see it!! And when I say whether I mean it we had sun shine and rain and thunder!

Dots poor bush turkey got so sodden and was all droopy and hanging limply that the library staff were joking about getting a ladder and going over there and “ringing its neck” to get the water out (and the rest of the body) That got a good laugh.

Sandie who made the wonderful hanging hearts from the big tree she is the liaison between the CRABS and the council (as she is an employee) She does Story time at the library with the children. She decided to take them outside and sit under the tree with the hearts and spider web and she told us all that there were 2 little boys whispering about the ‘Big spider web” she told them about the other webs a smaller one just to their left and they were all “No it’s not the big spider web” so I was happy with that 🙂

Unfortunately there were some thefts and a few items were stolen, one of the large panels that was attached to the lattice panel was taken, the pink possum was taken (later found and returned to its spot), a few other smaller items like the 3d amigurumi hearts we started with like 9 and ended with 5. A seat panel that was never recovered either.  It was sad but when people would bring their friends back they would say oh there was “this” here and “that” on this chair ect and wrote letters to the paper about how bad the theft was.

After the Fringe Festival was all done with we all sort of lost momentum as our next yarn bombing project was/is going to be the Warwick Jazz and Jumpers festival –  http://jumpersandjazz.com/yarn-bombing/ we wont find out the the theme until mid February so we all sort of lost momentum  with Yarn Bombing. The Fringe festival was mid September so some of us were working on projects for the next fringe festival others started working on the neurons and we were all discussing ideas for Warwick jazz and jumpers and sectioned themes for our park.

~*~

I just finished writing this up about half hour ago and then remembered this little story. On the day we were putting up all the yarn bombing a lady was walking through the park and it was about 2.30pm and most of the ‘big stuff’ was done it was just smaller bit and pieces and checking things were secured … I overheard the lady talking to Sandie and saying that she had been to Warwick Jazz and jumpers and while it was a fantastic even she really loved our park because you had to sort of look at things to see them. She loved how we had used the side gardens to put things up that were the size of regular pillow cases or smaller and spaced out so next time you walked through you would see something different.

~*~

Another CRABer came across an article about knitted neurons – as in brain neurons! I’ll post the link to the website with the free PDF downloadable pamphlet with the patterns in it. It has crochet and knit patterns as well as wrap patterns for crafters who don’t knit or crochet. We have experimented with alfoil, masking tape, plastic shopping bags and scrap material for the centre of the wrap neurons.  We have also used straws and pipe cleaners for the Axons (sticky out bits)   Sandie has set up appointments with the local libraries to do free workshops to help get people interested in the Neurons and hopefully boost our yarn bombing numbers.

This is where you can find all the info on the neurons and get the PDF pattern book –  http://www.scienceweek.net.au/neural-knitworks/

you will need to scroll down the page to – Interested in hosting a Neural Knitwork? It is number 5 on the list –  You’ll need plenty of yarn, needles, copies of our scientifically-based neuron crafting pattern books (3.4 MB PDF) and a comfy spot in which to create

You can also google images of crochet and knitted neurons and see mostly the same thing but there are a few images in there that are really cool!

20160109_235559
A crochet Pyramid neuron and an In progress Stellate neuron. And a sneak peek at another project up the back 🙂

***

I’ve also worked on a few little things but I don’t want to into them in this post as I’ve already gone on long enough so you are very likely to get another post in the next week or two. 🙂


On a totally unrelated side note I’m sitting out in the lounge trying to write and watch Ghostbusters with hubby at the same time… meaning my craft/sewing room was confiscated and I was moved to the lounge and I’m getting distracted LOL.

I hope you all had a safe and happy holiday season and I hope it was as stress free as possible, I also hope the back to school shopping goes just as stress free (pfft, yeah right I hear you say)

As always stay well everyone and –

Up, up and CROCHET!!


Creative creations!

I’m incredibly sorry that I haven’t updated in moths but I’ve had a family emergency and have had to travel away from home and my craft supplies 😥

In previous blog posts you may have read about the crochet Satellite reef – well it opened on the 13th of may and unfortunately for me I was unable to be there for the opening.

Needless to say I was upset as I had spent the same amount of time it takes to incubate a baby in your body…. (9 months) on the project. But I do have some pictures I can share with you.

I am still hoping to get some more soon – these have been sent to me from friends as I wont be able to see the instillation in the art gallery.

See if you can find any little sea creatures among the coral.

In the first pic the tall yellow cone-ish shape is one of my creations so is the second pic its kind of like a volcanic vent with bits of larva and such – not really coral I know but after seen that everyone was making mostly small things we needed some more sculptural pieces.

In the 3rd on the far side you can see part of the lists of names of the people who worked on the project.

So here are a few pics (wish I could share more and had more)

enjoy 🙂

reef1

reef2

reef36reef7reef22reef8

reef24  .

Well Seeing as I don’t have reliable internet access or any of my video equipment I’m afraid to say that I wont be able to reliably update my blog posts or youtube videos with crochet tutorials or what I’ve been working on.

I’ve actually had 2 friends have babies, one is in the Northern Territory in Australia and it doesn’t get cold there in winder so I couldn’t crochet anything for little Onna so I ended up switching back to cross stitch and doing a birth sampler for both babies and am still working on the Brighton blanket (Free on Revelry) for little Layla.

Brighton Blanket is in US terms but you can leave a comment below or email me at crochetconnections@gmail.com (Itry to check once a week) and I can help you with a translation for personal use.

Here is the link for the Blanket – http://www.ravelry.com/patterns/library/brighton-blanket

The pattern sounds tricky in the beginning so make sure you read it a few times!! The pattern says to use 11 colours… Um NO – I’m using 3 I strongly suggest you use a scrap yarn to practice the pattern exactly as it says with all the colour changes before trying it with your chosen colours.

I think its such a beautiful blanket that I might try to do a blog post on it of its own.

So until then –

Up, up, up and CROCHET!

Stay well everyone.

Many, many projects!!

I know, I know I’ve been lax again in updating… but I have an excuse!! A good one I promise!! I even have a picture!

I’ve mentioned in my videos that I’ve been working on the hyperbolic reef at my local art gallery with a bunch of other crochet and knitters and there are some really amazing and talented ppl!! We’ve got a lot of sitting pieces but we need a few hanging pieces so I’ve been trying to come up with something… which has been…. lets say fun 🙂

I’m currently working on 2 pieces at the moment both with mixed media – one is with cassette tapes and yarn and the other is with plarn (plastic bag yarn) cassette tapes and possibly yarn. the other is shaped like a really odd shaped witch or wizards hat bent, leaning to the side and 60cm (2ft) tall.

Coral piece, with Christmas card collage in background.

And another piece that is worked in 3 pieces. The main stem is a cardboard roll wrapped with the fury yarn (can’t remember name or brand of yarn).

3 piece standing coral.

I’m currently working on a hanging piece that kind of reminds me of a jelly fish and a sort of odd shaped hollow tube (kind of like a hollow log). I don’t have any photos of those at the moment but will take some shortly when I’ve got some more structure to them and more of an idea of what I want them to look like.


Since I meant to post this 2 days ago but got side tracked by trying to finish my coral thingy I’ll finish the post here even though it feels only half finished… I can always add updates soon.


ALSO

I have found some really awesome free patterns that I am able to share with you – they are in the public domain, that will be another video and post though, so I will give you the link then. The patterns are in US terms though so I will have a link to the pdf of translated to AUST/UK/EU terms. When I put up the patterns – I’ve been looking at making some Snoods – really cool vintage hair holder upperas, sort of a beanie/hairnet but cooler and prettier. It’s the end of summer where I am so I’m surprised I haven’t made any before now.

Check them out on google for a better look and idea. 🙂

I’m going to leave my post half finished here and sing off with my usual –

Up, up and CROCHET!!

Stay well everyone 🙂

The Treble Crochet!!

Wooohoooo I finally got the Treble Crochet video up!!

It’s been a stressful week! So stressful that I didn’t even have the energy to make it to my Crochet get-to-gether with some friends I’ve made while working on our local Hyperbolic reef project for our local art gallery!! Now THAT’S saying something!!

I have a lot to get into this post so I won’t blather on any more … (do I ever stop blathering??)

So in this video I cover how to make the Treble crochet stitch (Trc/TRC) how to increase and decrease as well as examples of how to use these stitches.

Youtubehttp://youtu.be/XhImT0g_OAQ

In this video I show you examples of increases – as we’ve already learned that an increase is just 2 stitches or more in the same space. I show you an example of a Chevron pattern – such a great pattern and can be used with almost any stitch

A basic chevron stitch pattern with chart and swatch.

The next example is the yellow Flower – I call it the wrap rose but you can find variations of this all over YouTube and the internet from yarn brands websites to personal blogs … I remember seeing my Nanna making many things (including this flower) that I see all over the internet these days and its tricky because I think my Nanna used to make that, then I see a blog with someone saying ‘this is my design’  which I have no doubt they created it… just 20 or so years after my Nanna was making it or I’ll sit and work on making an object and think there got it!! Then see an almost exactly the same pattern and think well I can’t post it cos it’s almost copy write infringement…

Any who the wrap rose as I call it is really simple this is the pattern for a small flower and you can increase the starting ch by 4 to add 1 additional petal. I’ve made these flowers with 30 and 40 petals.The turn out large and flat, good for brooches and large hair accessories.

The Wrap Rose

The Wrap Rose, a collage of pictures.

Foundation ch in multiples of 4 plus 1 so for each petal you want chain 4 chain stitches then at the end chain 1 extra chain stitch. You can work the standard wrap rose or my version, the only difference is in the 1st row, and my version is in blue, for this example we are going to make a chain of 29 for 7 petals – 7 x 4 = 28, 28 + 1 =29

Row 1 make 1 Dc in the 2nd ch from your hook and every ch to the end of your foundation Ch. turn your work

Alt row 1 – Divide you chain in approx. 3 parts in the first 3rd work Dc’s in the 2nd part work HTrc’s and in the last part work Trc’s (should work out to be 10Trc, 9HTrc , 9dc or in reverse.)

Row 2 Ch1 (counts as 1st Dc) Sk1 stitch, into the next stitch (3rd st from the end of row) work an increase of 5Trc’s into the st, Sk1 stitch. * 1Dc in next st, sk1, 5Trc Inc, sk1. Repeat from *across to end of row.

Now you just how to roll/fold your flower (as seen in video). If you chain too many in the beginning chain you can use that when you roll your flower so it looks like a little bud or just fold it down and hide it.

When you fold up your flower you will notice that you have a right side and wrong side (See picture below) try rolling your flower on the opposite sides for different looks.

Right side up top, wrong side on bottom with crochet hook.

Make sure you leave a decent tail length to use to sew the base of the flower together so it doesn’t un-ravel.

The next example that is shown and more info is give at the end of the video is the crochet baby cardigan. It’s called the Crochet Baby Set, No. 106 yep that’s what it’s called. I called it the ripple/chevron cardigan. The web site is http://www.freevintagecrochet.com/ There are some really cool patterns (and they have all passed into the public domain) the only thing is they are in US terms so if you want one of the patterns let me know and I’ll have go at translating it if you give me enough warning time. I already have the Ripple cardi translated to Au/Uk/Eu terms leave me a comment or email me at crochetconnections@gmail.com with Ripple baby cardigan in the subject line please also know that I will send you the file in a pdf format unless you request otherwise. Please give me a few days to reply to emails.

Here is a collage of 3 examples of the same chevron/ripple baby cardi (crochet baby set number 106)

Crochet baby set 106,  Cream and Pink, Cream and blue.
Crochet baby set 106,
Cream and Pink, Cream and blue.

Crochet baby set 106, Purple, Bright/fluro pink, Lime green, Bright light blue. Reversible due to how pattern works up.
Crochet baby set 106,
Purple, Bright/fluro pink, Lime green, Bright light blue. Reversible due to how pattern works up.

Chevron

Ok moving on to the chevron pattern/stitch

It’s not really a stitch – it’s a pattern but I call it a stitch or a stitch pattern but here’s a  couple of pictures.

Chevron-ripple collage
On the left a chevron Ripple and on the right chevron waves.

A very cool example of how to use the chevron pattern.

This post is meant to be about the Treble crochet… so far not so much… well I’m going to out in the pictorial on how to do the Treble now

Making a Treble crochet (abbreviated Trc) 

(Pictures are above the instructions)

The treble crochet is about twice the height of a double crochet. It is a very popular stitch producing a looser fabric than double crochet. Make foundation chain 2 chains more than the number of double crochet stitches called for. Skip first 3 chain stitches (will count as the turning chain).

Yarn over hook once, insert hook from front to back in the center of the fourth chain from the hook.

Yarn over, draw the yarn through the chain (3 loops on hook).

Yarn over, draw yarn through 2 loops on hook (2 loops remain on hook).

Yarn over, draw through 2 loops on hook (one treble crochet complete).

Yarn over, insert hook in the center of next chain, yarn over, draw yarn through stitch, yarn over, draw yarn through 2 loops on hook, yarn over, draw yarn through 2 loops on hook. Repeat across to end of foundation chain.

To begin the second row, turn your work. Chain three for the turning chain.

Skip the first treble crochet below the turning chain. Yarn over, insert hook from front to back under the top 2 loops of the next treble crochet in the row below, yarn over, draw yarn through stitch, yarn over, draw yarn through 2 loops on hook, yarn over, draw yarn through 2 loops on hook (first treble crochet complete). Repeat this step in each treble crochet across and in the top of the turning chain at the end of the row.

** DISCLAIMER ** – this is edited from US terms to Aust/UK/EU terms from  the lion brand learning center web page.

Ok so I think I’ve covered just about every thing… I hope I got it all. Please excuse any spelling and grammar mistakes – I have run it through spelling and grammar check but its not always accurate 🙂

Until next time

Up, up and CROCHET!!

Stay safe everyone 🙂

The Half Treble Crochet with Increases and Decreases

While I’ve got a little spare time… (spare time – whats that? you say) I’ll actually do a post on the Half Treble crochet (HTrc)

I said in the video that the HTrc is a great stitch to have in your stitch library and it really is! If your working on a beanie it works up really quick. The HTrc not only works up quick but it also has a little stretch in the fabric that is still warm but is still breathable for a summer slouchy beanie. I use the HTrc for simple winter headbands alot – it also makes a great band on a loose beanie/hat to keep long hair out of the way.

No pictures of the HTrc in projects atm – except in the video (I forget to take pic of projects before I give them away)

I’ll put in the youtube link again  and also another pictorial below that.

Youtube – https://www.youtube.com/watch?v=doybb2HKYSg

Here are some links to some of my other places –

Google+ – Crochet connections – https://plus.google.com/u/0/b/110985596557714123071/110985596557714123071/about (there are some really cool crochet communities)

Instagramhttp://instagram.com/crochet_connections

Ravelryhttp://www.ravelry.com/people/CrochetConnection (I don’t currently have anything up atm – I’m still waiting for patterns to be edited)

Onto the Pictorial-

Making a Half Treble crochet (abbreviated HTrc)
The half treble crochet comes halfway between a Double crochet and a Treble crochet in height.

Pictures are above the written instructions.

Make a foundation chain one chain more than the number of half double crochet stitches called for. Skip first 2 chain stitches (will count as the turning chain). Yarn over hook once, insert hook from front to back in the center of the third chain from the hook.

Yarn over, draw the yarn through the chain (3 loops on hook).

Yarn over, draw through 3 loops on hook (one half double crochet complete).

Yarn over, insert hook in the center of next chain, yarn over, draw yarn through stitch, yarn over, draw yarn through 3 loops on hook. Repeat across to end of foundation chain.

To begin the second row, turn your work. Chain two for the turning chain.

Skip the first half treble crochet below the turning chain. Yarn over, insert hook from front to back under the top 2 loops of the next half treble crochet in the row below, yarn over, draw yarn through stitch, yarn over, draw yarn through 3 loops on hook (first half treble crochet complete). Repeat this step in each half treble crochet across and in the top of the turning chain at the end of the row.

DISCLAIMER – ** These instructions have been edited from US terms from the Lion Brand Learning Center webpage **

I did have all the stitches explained as above in Aust/UK./Eu terms but somehow lost the file

I hope to be filming the Treble crochet stitch video soon, am trying to find a few of my previous projects as examples for the video… think I’ve given most of them away 🙂

So until the next video …

Up, up, and CROCHET!!

Stay well everyone.

Just a quick update.

I just managed to upload the how to Half Treble Crochet with increase and decrease video

This is the youtube link –

http://youtu.be/doybb2HKYSg

I hope to start work on the Treble crochet video soon – I also hope to start on individual videos for the increase and decrease videos as well as individual stitches so the videos don’t run so long. We will just have to see.

Ok thats me signing off for now got a few stressful things going on atm so …

Up, up, up and CROCHET!

Stay well everyone.

The Double crochet stitch

I finally uploaded my video to youtube on the Double crochet stitch the other day and have been a little slack in updating …

When I want to learn a new stitch I try to learn all I can in one go then go back over everything so that’s what I’ve tried to do in my video, in the description box you can look to see where the times for the certain stitches are – I put in how to do the Dc – (Double crochet) into your beginning chain, how to turn your chain, working back along your first row then finding and working in your last stitch. I then show you how to do a Dc inc (Double crochet increase) and and Dc dec (Double crochet decrease). As we move through the video we will I show you how to increase and decrease in more pointed shapes my example being the letter N on the beanie in the intro of the video.

The letter N used as an example on pointed increase and decrease with double crochet
The Nixon Beanie – The letter N used as an example on pointed increase and decrease with double crochet

So here is the link for the video – http://youtu.be/7WBG2OY9bZA

I’m going to put in the written instructions on how to make the Dc stitch – just the stitch, not the turning, increases or decreases – that’s just beyond my descriptive skills. lol

I actually found written instructions online so that was easier.

The Double crochet – (starting from a chain)

Single Crochet Step 1

Make a foundation chain one chain more than the number of double crochet stitches called for.

Insert hook from front to back in the center of the second chain from the hook (2 loops on hook).

Single Crochet Step 2

Wrap the yarn, from back to front, around the hook (this is called yarn over and is abbreviated yo), draw the yarn through the chain (2 loops on hook).

Yarn over once again. Draw through 2 loops on hook (one double crochet complete).

Single Crochet Step 3

Insert hook in the center of next chain, yarn over, draw yarn through stitch, yarn over, draw yarn through 2 loops on hook.

Single Crochet

Repeat across to end of foundation chain. To begin the second row, turn your work. Chain one for the turning chain (does not count as a stitch). Insert hook from front to back under the top 2 loops of the first double crochet in the row below, yarn over, draw yarn through stitch, yarn over, draw yarn through 2 loops on hook (first double crochet complete). Repeat this step in each double crochet across.

These instructions are from the lion brand website but were in Us terms and I had to change the terms so I may have missed something, so sorry about that if I have.

If I’ve missed anything I’ll leave it in the reply/comments below – my brain hasn’t exactly been operating at optimal performance recently.

Once again, until next time

Up, up and CROCHET!!